
Tracheostomy Tubes
There are times when an an infant or child requires a breathing tube for an extended period of time. Often this is related to an obstruction of the upper airway (nose, mouth, larynx or trachea) necessitating a tube to bypass the obstructed site. Other times, a child may require mechanical ventilation, or a breathing machine, for a protracted period of time such as is the case in chronic respiratory failure. In these cases, a tracheostomy tube may be needed.

Tracheostomy tubes bypass the upper airway if there is an anatomic obstruction. They can also provide access for ongoing or chronic mechanical ventilation.
Tracheostomy tube placement
A tracheostomy is an opening in the neck connecting the outside environment (e.g. air) to the trachea. A tracheostomy tube is the plastic tubing used to provide ventilatory support. A tracheotomy (opening in the neck) is created by a surgeon (usually an otolaryngologist) under general anesthesia and a tube is kept in place by ties, making it a “fixed” airway. Fixed, because it is more secure than a breathing tube placed through the mouth or nose. Typically a lengthy conversation is held prior to placement, often including surgeons, neonatal or critical care physicians, a pulmonologist and the family. The benefits and risks of a surgical airway (aka: tracheostomy tube) should be discussed with the multidisciplinary team and family prior to proceeding.
The Positive and Negative Aspects of Having Tracheostomy Tube
Negatives:
Surgery, requires general anesthesia
Recovery 5-7 days
Peri-operative discomfort
Risk of infection
Impairs ability to clear airway secretions (cough is less effective)
Can make swallowing more challenging
Slight increased risk of aspiration
Positives:
Allows removal of endotracheal tube from mouth or nose
Improved nursing cares
Allows for alternative positioning
Improved socialization
“Fixed” airway allows more movement/interactivity of child
Requires less analgesia/sedation
Allows for earlier rehabilitation (PT, OT, Speech)
Generally well tolerated
Doesn’t have to be permanent (reversible)
Allows for phonation (speaking)
Facilitates transfer to sub-acute facility or even home!
Recovering from Surgery:
Once placed, patients typically recover quite quickly but often need to remain relatively still for around 5-7 days to allow the stoma (the surgical opening) to “mature” or scar up around the plastic breathing tube. Typically there are stitches left in place to maintain the position of the tube. The surgery is typically well tolerated, however as one would expect, there can be a little discomfort or pain in the immediate days following the procedure. After 5-7 days, when the stoma is “mature”, the stitches are removed and the patient can move more readily.
Planning for your child’s future
Tracheostomy placement is often the first step towards preparing to leave the hospital (to sub-acute facility, rehabilitation facility or even home). It’s important for parents to learn how to trouble shoot and remove/replace a tracheostomy tube prior to leaving the hospital. In order to best address any urgent needs for your child, it’s helpful to know a little more about the commonly available tracheostomy tubes.
Understanding your child’s tracheostomy tube:
A tracheostomy tube is typically described by its brand, its size in length and diameter, and its cuff status. There are two main brands: Shiley (by Medtronics) and Bivona (by Smiths-Medical). Diameter sizing refers to the inner diameter of the tube and range from 2.5 mm on up while length generally refers to neonatal, pediatric or adult (longer length for a given diameter) lengths. A typical tracheostomy description might be a “Shiley 3.5 mm neonatal cuffless tracheostomy tube” or a “Bivona 4.5 pediatric cuffed tube”. It’s important to know what brand, size and cuff status your child’s tracheostomy tube is. (See Shiley and Bivona websites in the resources section.)

Pediatric (top) and neonatal (bottom) uncuffed tracheostomy tubes.

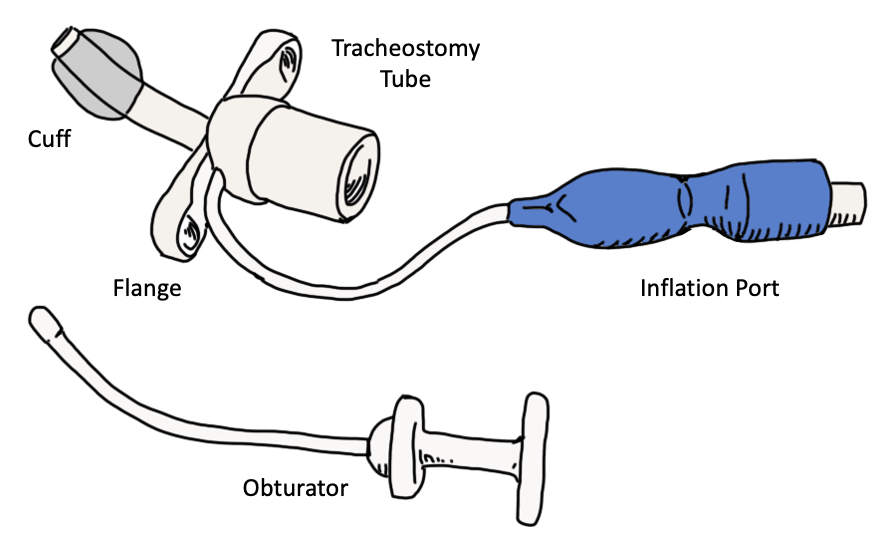
Examples of cuffed tracheostomy tubes. Blue pilot balloon indicate cuff is to be inflated with air. Clear pilot balloon indicates sterile saline.
To cuff or not to cuff, that is the question?
In most patients, an air leak around the tracheostomy tube out through the vocal cords may be present. This is great for speaking, but in certain conditions (e.g. pneumonia), high pressures or large volume administered by a mechanical ventilator may be required and an air leak may make ventilation difficult. If present, a cuff can be inflated to help reduce or eliminate this leak and can improve ventilation. Typically a cuff should be considered a temporary measure as lung pathology heals or resolves. On rare occasions, children may be sent home with a cuffed tube. A cuff can be circumferential or tight-to-shaft (TTS; a trademark with bivona). Circumferential cuffs are inflated with air while TTS cuffs are so thin that air would permeate through, as such, sterile water is used instead.
Tracheostomy Care
How to replace a tracheostomy tube:
Prepare new tube for placement
Ensure appropriate brand, size and cuff status
Ready new tracheostomy ties
Ensure cuff is deflated
Place obturator in new tube
Apply sterile lubricant
Prepare current tube for removal
Deflate cuff (if inflated)
Remove tracheostomy ties
Disconnect ventilator (if appropriate)
Gently remove old tracheostomy tube following curvature of the tube
Place new tracheostomy tube + obturator into stoma (opening) following the curvature of the tube
Do not force if resistance is encountered (pull out and try again)
Replace ventilator
Secure tracheostomy tube ties
Listen for breath sounds on both sides of the lungs
Adjust ties and address any comfort related measures

Routine Trach Change by Cincinnati Children’s

Emergency Trach Change by Cincinnati Children’s
Useful Resources:
Shiley (Medtronics) Tracheostomy Tube Home Care Guide for Pediatrics: Click Here
Nationwide Children’s Tracheostomy Care Resource: Click Here
Mount Sinai’s Adult Tracheostomy Care Resource (helpful images): Click Here
https://www.cincinnatichildrens.org/health/t/tracheotomy-handbook